


Overview
Project Hub P3M is a Microsoft Power Platform (model-driven) Power App. The application is rich in features and functionality and has been designed for organisations seeking to manage their entire Strategic Portfolio of work. This site provides a comprehensive overview of each feature, and its functionality, set up and processes associated for optimising and maximising full capabilities.
The below diagram "P3M Strategy House" provides an overview of the components available and their relationships. Additional features, and components are available and customisations are possible, by either the organisation or the Digital Project support team.

Projects
The definition of a project within project hub is a temporary endeavor designed to complete a piece of work, with defined start and finish dates, delivered by allocated resources.
Projects can be created within Project Hub by selecting "Projects" on the left hand navigation pane of the Portfolio tab. In order to create Projects the end user needs to be in a security group that has create project permissions as well as have the appropriate Microsoft Project license.
Project records out of the box utilise Project for the Web which is visible on the tasks tab but can also be accessed via Project.Microsoft.com within your organisation. Projects form the core feature and aggregation roll up of information within Project Hub as a P3M platform.

When a new project is created the default view on first creation is a summary tab. On the summary tab the end user is required to capture the following information:

There are 3 mandatory fields marked with a red asterisk that need to be completed
Note: it is not mandatory to update the program, portfolio and business unit fields however if these are not updated, the project and its associated record information will not be visible at these levels. If the name of the program, portfolio or business unit does not appear in the search or drop down list please contact your administrator.
General
- Name: Name of the project
- Start & Finish Enter the earliest and latest dates for your project (this will drive the investment and resource calendar grids)
- Type: Choosing either workstream or project. A workstream can be seen as a project within a project, almost as a smaller project. The default selection is Project.
- Schedule Type: You can choose what scheduling platform your planning to use for the project. The default is Project for Web, however other choices upon save will show a URL box , where you can link to a different platform.
- Project Template: You can choose different types - which upon selection will show different stage gates on the business process
-
Project Status: Set to the appropriate status
Tab Selector

The tab selector has been designed to help create an improved user experience, where you may not wish to see all tabs along the top of the project record allowing the end user to control visibility. The default tabs that appear upon project creation include the following (click to review each feature and how it works)
- Dashboard
- Summary
- Business Case
- Assessment
- DVF
- Actions
- Approvals
- Benefits
- Changes
- Documents
- Investment
- Lessons Learned
- Milestones
- Status Report
- Vendors
- Workstreams
- Tasks
- RAID
- Audit
Strategy
You can link your project to an existing strategic theme. This ensures that at a reporting layer the projects progress, investment and related RAID controls are visible through reporting metrics, allowing the organisation to gain visibility of progress related strategic objectives, themes and KPI's. For further details on how to set up strategies refer to the "strategy module".

Project Assessment
This section is set to read only and designed to highlight to the end user the current recorded values upon the completion of the assessment, DVF, Investment tabs. For further information on how the assessment feature works click here.
- Project Budget: Total sum of Investment Budget within years across the financial investment grid (not including benefits)
- DVF Score: Overall score (refer to the DVF tab) on how this calculates
- Assessment Score: Total score for the assessment tab
- Project Tier: Budget, Tier Matrix (refer to the assessment feature)

Business Process
In project management terms the business process is often known as the stage gates for the project. When a new project is created it start in stage “1. Idea” once the new project has been approved to the next stage it will move to the stage called, “2. Concept”.

Depending on the Project Template field chosen, the business process may change to different gates.
- Construction - (Idea > Concept > Initiate > Design > Analyse > Construct > Close Out)
- Product Development - (Idea > Concept > Scoping > Business Case > Development > Test > Launch)
- Marketing - (Idea > Concept > Opportunity > Strategy > Market Research > Implementation > Benefits)
- IT - (Idea > Concept > Initiate > Execute > Close > Benefits)
The business process stage gates will have an approval between I. Idea stage only - which requires approval fields updated on the summary tab.
Approvals
Upon entering a name for the approver in the drop down / search box, and select "Stage Approvals" within the ribbon, a workflow will run to create an approval record for Idea stage approval. Note: Ensure your project is "saved" before choosing this option.

Approving Project Ideas can be completed by navigating to the approval table on the left hand navigation. The approval section includes approvals for Ideas, Risk Acceptances, Issue Acceptances, as well as other approvals within the platform. Refer to the Approvals feature on how to manage approvals.

Stakeholders
This section allows the end user to record information specific to the stakeholder group for the project. These users selected are not part of controlling permissions for the project, but rather for Power BI and Dashboard Reporting insights, and filters.

Project Access Permissions (if enabled)
The teams permission model allows project , program and portfolio managers to control the level of access to records within their team. The following rules apply:
What can the user see:
- If a user is in a project owner team, they will just be able to see the project.
- If a user is in a program owner team, they will be able to see the projects linked to the program as well as the program.
- If a user is in a portfolio owner team, they will be able to see the projects and programs linked to the portfolio as well as the portfolio.
Each team has an administration owner user which is defaulted to the creator of the record when the record has been created. In order to add additional users to the team, the admin user must add the team members in order for them to see the project, program or portfolio.
To set up the team permission click on the name of the team permission in bold text Record Owner Team. The following team record will open. By default you will see a list of end users whom have access to the project record.

Assigning permissions requires the end user to select "Add Existing User" in the top right dialogue box. The end user selected behind the scenes (and controlled by the administrator) is also in a security group (not controlled by the Project Manager). This means that if the user added has edit access to say risks for example they will be able to access the project and edit risks. The role for the Project Manager is to just add the appropriate end users to the dialogue box. Refer to the Permission Security Groups module.
Top Ribbon:
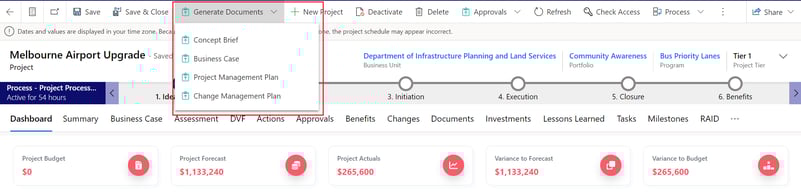
The top ribbon is where an end user can save the project, program or portfolio. When inside a project you can also generate numerous document templates for your project, by selecting the Generate Document dropdown button. This is also where the Business Process flow and Business case can be submitted for approval, under the Approvals dropdown button.
Programs
The definition of a program within project hub is a group of related projects, and activities that are coordinated and managed in a structured manner to achieve a specific set of strategic objectives or outcomes.
Programs can be created within Project Hub by selecting "Programs" on the left hand navigation pane of the Portfolio tab. In order to create Programs the end user is required to be in the Program security group. To create a new Program select "Program" and "+ New"
When a new program is created the default view on first creation is a summary tab. On the summary tab the end user is required to capture the following information:
- Name of Program
- Business Unit
- Portfolio (optional)

General
- Name: Name of the program
- Description: Description of the program
- Business Case: Description of the business case for the program
- Program Type: Multi-choice field to choose what type of program
- Program Goals: Multi-choice field to choose the program goals
- Program Status: Status of the program (note: the dashboards and reports display open programs in most instances)
- Program Start Date: Enter a start date for the program
- Program Finish Date: Enter a finish date for the program
- Allocated Budget: If the program has a budget, you can compare the allocated budget against consumed budget from projects
Tab Selector
When a new Program is created the following tabs will appear. Click on each item below to read more about the feature and functionality.
- Dashboard
- Summary
- Projects
- Actions
- Changes
- Investment
- Lessons Learned
- Scope
- Vendors
- Audit
- Benefits
- Documents
- RAID
- Audit
The tab selector allows you to choose to show or hide tabs when your in a Project, Program or Portfolio record.

Project Tab
The project tab shows a list of projects associated to the program record. You can also choose "Add existing Project" to associate a new project to your program record.

Note: There are no Business Process flows, Document Libraries or Resources for Programs. The investment grid aggregates financial information from projects associated to the program. The dashboard tab for a Program shows aggregated project financial data. Read more about the Program Dashboard and its features functionality.
Portfolio's
The definition of a portfolio within project hub is a collection of projects, programs, and other related activities that are managed together to achieve a common set of strategic goals and objectives.
Portfolios can be created within Project Hub by selecting "Portfolios" on the left hand navigation pane of the Portfolio tab. In order to create Portfolio's the end user requires the appropriate Portfolios creation permission (see permissions). When wanting to create a new Portfolio simply select "Portfolios" and "+ New"

When a new Portfolio is created the default view on first creation is a summary tab, where the end user can capture summary information:

There are only 2 mandatory fields that need to be completed, including the name and business unit name to the record. When the Business Unit name is updated, the Portfolio will be visible within the Business Unit record.
- Name: Name of the Portfolio
- Business Unit: Select the Business Unit Name (or create new if the business unit does not exist)
Tab Selector section:
When a new Portfolio has been created the default tabs will appear:
The tab selector allows the end user to either choose to show or hide tabs when in a Project, Program or Portfolio record.

Project Tab
The Project Tab shows all projects that have been associated to the portfolio (to go to a project the end user can double click the record)

Program Tab
The Program Tab shows all programs that have been associated to the portfolio (to go to a program the end user can double click the record)

Note: To add more projects or programs to the portfolio - click on “Add Existing Project/Program” and look for the relevant record. There are no Business Process flows, Document Libraries or Resources for Portfolios (out of the box), however discuss customisations with your administrator.
Business Unit
The definition of a business unit within Project Hub refers to a department, and owner of portfolio/s, responsible for the delivery of work delivered against each investment strategy.
Business Units can be created within Project Hub by selecting "Business Units" on the left hand navigation pane of the Portfolio tab. In order to create Business Units the end user requires the appropriate Business Unit creation permission (see permissions). To create a new Business Unit select "Business Units" and "+ New"
When a new Business Unit is created the default view is the summary tab, where the end user can enter the following information:

When a new Business Unit has been created the default tabs will appear:
- Dashboard
- Summary
- Portfolios
- Risk
- Issue
- Changes
- Benefits
- Milestones
Portfolio Tab
3 tables will appear with all relevant Portfolios, Programs and Projects that are related to the Business Unit.


Note: There are no Business Process flow, Document Libraries or Resources for Business Units.
Business Case
The definition of a business case in Project Hub P3M is an automated document that provides a detailed and structured justification for investing in a particular business project. The purpose of a business case is to provide decision-makers with the information they need to evaluate the feasibility, potential benefits, risks, and costs of the proposed initiative and make an informed decision about whether or not to proceed. In Project Hub P3M the business case can be used for formal documentation acceptance, review and approval for the project.
To create a business case navigate to the business case tab within a project record.

Complete the following sections on the form, in preperation to autogenerate a word document within the document library within a project.
Business Objectives, Problem Statements, Business Impacts, Business Stakeholders (enter free text content to record about your business case)
Scope: Add scope records to record the scope required to deliver the project
Assumptions: Add relevant assumption records to record the required assumptions to deliver the project
Benefits: Add benefits that relate and are associated to each scope record
Approver Enter the name of the person whom you would like to approve your business case. This generates an approval record in the approval entity.
Select within the top ribbon bar "Stage Approvals" and choose Business Case to auto-generate the business case word document.
Note: Business cases can only be created at a project record level.
RAID
Risks
The definition of a risk in project hub refers to the possibility of an uncertain event or condition occurring that could have a positive or negative effect on a project, program, or portfolio.
Creating risks within Project Hub P3M, can be achieved at 3 levels (Project, Program, and Portfolio). Risks can be created directly within the P3 records, and or by navigating to the Risk table and selecting new risk (note you will need to associate the flyout menu to the appropriate record in this instance).
Create New Risk
When creating a new Risk record the follow form will appear with a business process flow at the top that says Risk - Issue.

There's only 1 mandatory field that needs to be filled out in order to save the Risk record which is the Risk Type.
The risk types can be seen as the following:
- Project
- Operational
- Strategic
- Change
When selecting a risk type, a different form will appear that needs to be filled out on the right side (if you have purchased the separate risk app)
Risk Summary

- Name: enter the risk name
- Description: the description of the risk, including narratives of risk and its impact
Details
- Type: select the type of the record from Project risk, Operation risk, Strategic risk and Change risk (or you may see this set to default Project Risk)
- Status: select the status of the record from Open, Draft and Closed (note open risks are shown on the project, program, portfolio dashboard)
- Risk Appetite: rate the risk appetite from Low, Moderate, High and Extreme
- Category: select the category of the record from a range of categories
- Review Date: select the review date
- Assigned To: assign a Risk Manager to the record
- Vendor: assign a Vendor related to the record
- Cost Exposure: estimate the Cost of the risk
Due Date
- Due Date: select the Due Date of the record
- Unlock: toggle between "Yes" and "No" to count the number of times the due date has been changed in the risk form
- No. Changes: reflect the number of changes made to this due date record
- Forecast Date Change History: shows the Due date change details, time, date and stamp of editor
Assessment
- Likelihood: the probability or chance of a risk event occurring
- Consequence: the potential impact or outcome of a risk event if it occurs
- Rating: a combination of the likelihood and consequence of a risk event and it is calculated by multiplying the likelihood and consequence ratings that represented on the risk matrix
Details
- Cause: enter the reason or source of the risk event
- Response: enter the action that is taken to address the risk event
- Mitigation Plan: enter a set of specific actions and strategies that are developed to reduce or eliminate the likelihood and/or consequences of a risk event
- Contingency plan: enter the plan that is developed to respond to the risk event if it occurs, despite the implementation of the mitigation plan.
Risk to Issue Creation
After saving the risk to the project, program, portfolio or business unit, if necessary, the Risk can be turned into an issue.
- To create an issue from a risk, select the dial in the business process of the risk, and choose Next Stage, then "Create"
- In the new issue form, complete the issue details to save the new issue record

Risks can also have an acceptance tab, where the end user can nominate whom the risk is assigned to. To assign a risk to a user:
1. Select the Risk Acceptance Tab
2. Enter a name in the approver box
3. Swipe right "Submit for Approval"
Note: this will create an approval record for the nominated approver to accept the risk. Out of the box there are no email alerts.

Issues
An issue in Project Hub P3M refers to a problem or challenge that arises during the course of a project, program, or portfolio that needs to be addressed or resolved
When creating a new issue the summary tab, shows a series of boxes on the screen for the end user to complete. If the issue has been created from a risk, the relevant associated risk information will be complete.

Details
- Name: enter the name of issue
- Description: the description of the issue, including narratives of risk and its impact
- Status: select the status of the record from Open, Draft and Closed (note only open issues are shown on project, program, portfolio dashboards)
- Assigned To: assign a team member to the record
- Vendor: assign a Vendor related to the record
- Resolution: identify the resolution of the issue, including analysing the issue, identifying the root cause, developing a plan to address the issue, and implementing the plan.
Rating
- Rating: assess the severity and impact of an issue on a scale of low, moderate, high, very high or extreme
Related Risk
- Related Risk: When the issue record is assigned to the related risk, a summary view of the issue will be displayed beneath the field that shows the assessment and rating information of the risk. If not, choose the appropriate
Due Date
- Due Date: select the Due Date of the record
- Unlock: toggle between "Yes" and "No" to count the number of times the due date has been changed in the risk form
- No.Changes: reflect the number of changes made in this record
Issues Acceptance Approval
- To create an approval record (assigning a user to an issue) assign an Approver, and then toggle the "Submit for Approval" option to "Yes", save the record. This will trigger the creation of a related approval record.
- Users can check the "Approval Status" to view the progress of the approval process, and "Approval Comments" for more information
- Fields such as Requested By, Requested On, Responded By, and Responded On provide date information regarding the approval process. These fields track the request and response dates of the approval, and can be used to monitor the progress of the approval process and ensure timely completion. By tracking this information, project managers can identify potential bottlenecks or delays in the approval process and take appropriate action to keep the project on track.
Assumptions
In Project Hub P3M assumptions are critical elements that are used to establish the project's scope and define the activities that are required to achieve the project's goals and objectives.
To create a new assumption select the + New Assumption button

- Description: the detailed explanation or documentation of an assumption made during the planning or execution of a project or task. Assumptions are factors that are believed to be true, but have not been verified or proven.
- Assigned To: assign a team member to the record.
- Status: select the status of the record from Open, Draft and Closed
Note: The default value for “Status” is always Draft however the end user can select the appropriate assumption state. Assumptions are also related to scope records, when completing a business case. To review the business case creation you can read more here.
Dependencies
In Project Hub P3M dependencies refer to the relationships between project milestones, vendors, and business units. Dependencies are critical in determining the project schedule and ensuring that the project is delivered on time and within budget. In Project Hub P3M, there are 5 types of dependencies:
- Project to Project
- Project to Business Unit
- Business Unit to Project
- Vendor to Project
- Project to Vendor
Dependencies can be created in the RAID tab. There are five types of dependencies, and each type requires a Provider and As Receiver.
- The definition of a provider: The record that is driving the service
- The definition of a receiver: The record that is receiving the service
When creating a dependency the default view is the summary tab where the user can capture the following information:

Summary
- Name: enter the name of issue
- Description: the description of the dependencies
- Dependency Type: Select the dependency type from the following selected type:

- Rating: refers to the level of interdependence between two projects, vendors and business units on a scale of low, moderate, high, very high or extreme
- Status: select the status of the record from Open, Draft and Closed
The following fields may change on the form depending on the type of dependency you have selected.
Provider
- Provider Project: assign a project as provider
- Provider Vendor: assign a vendor as provider
- Provider Business Unit: assign a business unit as provider
- Provider Milestone: assign the related milestone in the dependency record as provider
Receiver
- Receiver Project: assign a project as receiver
- Receiver Vendor: assign a vendor as receiver
- Receiver Business Unit: assign a business unit as receiver
- Receiver Milestone: assign the related milestone in the dependency record as receiver

When the provider, receiver and its related milestone record are assigned to the record, a summary view will be displayed beneath the field that shows more detailed information
Due Date
- Due Date: select the Due Date of the record
- Unlock: toggle between "Yes" and "No" to count the number of times the due date has been changed in the risk form
- No .Changes: reflect the number of changes made in this record
Dependency Approval
- To create an approval record for dependencies, toggle the "Submit for Approval" option to "Yes", assign an Approver, and then save the record. This will trigger the creation of a related approval record.
- Users can check the "Approval Status" to view the progress of the approval process, and "Approval Comments" for more information
- Fields such as Requested By, Requested On, Responded By, and Responded On provide date information regarding the approval process. These fields track the request and response dates of the approval, and can be used to monitor the progress of the approval process and ensure timely completion. By tracking this information, project managers can identify potential bottlenecks or delays in the approval process and take appropriate action to keep the project on track.
Lessons Learned
The definition of lessons learned within Project Hub P3M refers to lessons learned from a particular experience or project. Lessons are often used in project management and are used to document and share information about what worked well, what did not work well, and what can be improved for future projects.
Lessons Learned can be created by selecting "Lessons Learned" on the left navigation or within the Lessons Learned tab of a Project, Program, Portfolio or Business Unit.

The default view is the summary tab where the user can capture the following information:

- Name: enter the name of lessons learned
- Category: select the category of the record from Resource, Scope, Financial, Operational and Time
- Assessment: To rate a lesson learned, you can use a scale of positive or negative to indicate the effectiveness of the lesson in achieving its intended goals. A positive rating would indicate that the lesson was successful in achieving its goals, while a negative rating would indicate that the lesson was not successful or had unintended consequences.
- The Assessment field is always set to a negative Lesson Learned, which can be changed to positive.
- Description: enter the description or details of the lesson learned. This should include a clear and concise explanation of the situation, problem or opportunity, the actions taken, and the results achieved.
- Impact: include an assessment of the effect the lesson had on the project, organisation, or team. This could include the positive or negative consequences of the lesson, the changes in performance, or the benefits or drawbacks of implementing the lesson in the future.
Note: When creating a new Lessons Learned through use of the left navigation, remember to link the record to a Project, Program, Portfolio and Business Unit in the top right flyout menu.
Tasks
Tasks within Project Hub P3M, utilises an iframe of Microsoft Project for the Web from the organisations environment. When a project is created the tasks tab by default is provisioned with an empty schedule. There are 5 tabs a user can use to manage their schedule:
- Grid
- Board
- Timeline
- Charts
- People
- Assignments

Grid View
The default view of the Task tab allows you to create a set of tasks and task groups, edit task details, assign team members, and evaluate the time and effort required to complete each task. This view provides an organised user-friendly way to manage and track the progress of individual tasks and the overall project.
By using task groups, you can group related tasks together and easily manage dependencies and timelines. You can also assign team members to specific tasks, set deadlines, and evaluate the expected time and effort required to complete each task. This information can be used to develop more accurate project timelines and allocate resources more effectively.
Board View
This view provides a visual way to manage and track tasks and projects using customisable boards (kan ban similar). Boards are made up of columns that represent the stages or status of a task, and tasks can be moved between columns as they progress. This view allows for quick and easy tracking of task progress and status.

Timeline
The timeline provides a visual timeline of tasks and projects, allowing you to easily view project timelines and dependencies. This view can be used to plan and track project milestones, and to identify potential scheduling conflicts or delays. You can also select each row and move tasks around changing dates and critical path.

Charts
The Charts includes several chart options, including pie charts, bar charts, and line charts. These can be used to visualise project data and provide an at-a-glance view of project performance and status.

People
People View includes a People feature that allows you to manage and track team members and their roles in a project. This feature provides a central location for managing team members, and includes features such as resource assignments, with built in drag and drop functionality.

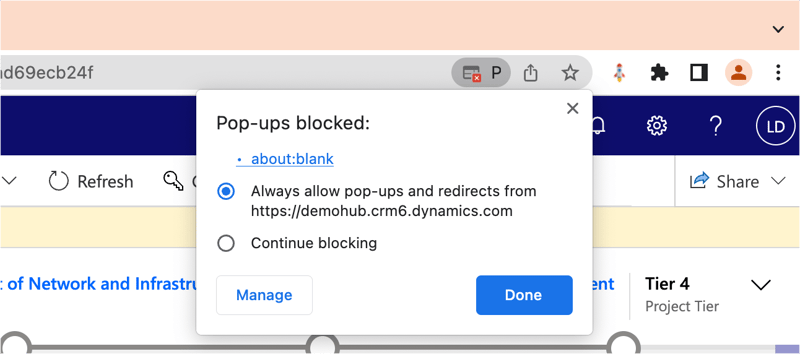
ERROR NOTE: If unable to view Project for the web and experience the follow error:

Remember to enable your popups by clicking on the pop-up blocker and selecting "always allow pop ups":
Assessment
Enterprise Assessment
The assessment features allows the end user to complete an enterprise assessment, and series of scores, designed to drive insight into the level of risk, complexity, strategy and change required to deliver the project.
The Assessment tab is only located within a Project Record, and is divided into 4 sections:
- Complexity Assessment - This is an evaluation of the level of complexity of a project, including complexity of scope, estimated duration, estimated total cost, expected benefits over 5 years and estimated resource
- Change Assessment - This is an evaluation of the impact of a proposed change on a project, including people impacted, type of change, degree of process change, degree of technology change and training required to adjust change
- Risk Assessment - This is an evaluation of the potential risks impacted on different areas, including community, legal risk, performance, technology and governance
- Strategy Assessment - This is an evaluation of the effectiveness and possible benefits of a project related to relevant strategy, including increase employee productivity, reduce organisation risk, provide safe services to community, respecting communities and heritage, and environmental sustainability.
Each section is given a Score and Type as per the image below for each section. A final overall score out of 100 is then recorded against the project.

Project Tier
The project tier is calculated base on the overall assessment score and budget size (Investment tab) of the project. In general, higher project tiers indicate larger and more complex projects, while lower tiers indicate smaller and less complex projects. Project tiers may be used to guide project selection, resource allocation, and risk management, and can help to ensure that appropriate resources and oversight are provided for each project.

DVF Assessment
The definition of DFV is desirability, feasibility and viability. This is another assessment option that can be used by projects only within Project hub P3M.
The DVF tab indicates the project's:
- Desirability
- Feasibility
- Viability
Each section has its own set of questions with a dropdown selection on how impactful each section is. Once filled out and saved a DFV score will appear at the top of the tab indicating the impact.

- Desirability: This refers to whether there is a genuine need or desire for the project or product among the target market or audience. It involves understanding the customer or user needs and preferences, and ensuring that the project or product addresses those needs effectively.
- Feasibility: This refers to the technical and operational feasibility of the project or product. It involves assessing whether the project or product can be developed and delivered within the constraints of the available resources, including time, budget, technology, and human resources.
- Viability: This refers to the financial viability of the project or product. It involves evaluating the potential profitability and sustainability of the project or product, and assessing whether it can generate sufficient revenue to cover the costs and provide a return on investment. It also involves assessing the risks and uncertainties associated with the project or product, and developing strategies to manage those risks effectively. By considering desirability, feasibility, and viability, organisations can make informed decisions about which projects and products to pursue, and how to allocate resources effectively to ensure their success.
DVF Score
DVF Score is a quantitative score that is assigned to a project or product idea based on its desirability, feasibility, and viability. Each question is recorded as:
- Low: 0
- Medium: .5
- High: 1
The scores are then combined to produce an overall DVF score, which can be used to rank or prioritise the project or product ideas. The lowest score is 0 and the highest score is 9.
A high DVF score indicates that the project or product idea is highly desirable, feasible, and viable, and is likely to be successful if implemented. By using a DVF score, organizations can make more objective and data-driven decisions about which projects and products to pursue, and how to allocate resources effectively to ensure their success.
Milestones
The definition of milestones within Project Hub P3M, is a key date with zero duration, and an action or task that needs to occur by that date.
Milestones can be created on the tab of a Project, Program, Portfolio or Business Unit. The default view is the summary tab where the user can capture the following information:
- Name: enter the name of the milestone
- Description: the description should include the specific details of the milestone, such as its purpose, deliverables, and objectives. It should also outline the key tasks or activities required to achieve the milestone, and any dependencies or risks that may impact its completion.
- Project Type: this will be automatically mapped from linked project
- Status: select the status of the record from Open, Draft and Closed
- Vendor: assign a Vendor related to the record
- Deliverable: select yes or no depend on whether the milestone is deliverable or not
- Progress: enter the percentage of the completion of the milestone, from 0-100.
- Due Date: select the Due Date of the record
- Unlock: toggle between "Yes" and "No" to count the number of times the due date has been changed in the risk form
- No.Changes: reflect the number of changes made to the duate field
The default form has the status always as Draft, upon creation. The milestone can also be assigned to a user either under the Details or Stakeholder section.
Note: When creating a Milestone via a Project, Program, Portfolio or BU the Milestone will automatically link to the parent record in the top right fly out menu. If your milestones are showing as read only - this may be due to your milestones displayed from the Project Task Schedule. In this case the milestone will be any task with zero duration on the "tasks" tab.
Status Report
The definition of a status report in Project Hub P3M allows end users to report on the health and status of their project, program or portfolio, where overall health is represented throughout record dashboards and the home page of Project Hub P3M.
The status is a free option set choice field:
- Green
- Amber
- Red

The status record is designed for the end user to complete the following choice values, and add commentary:
- Risk Status
- Issue Status
- Change Status
- Resource Status
- Financial Status
- Schedule Status
- Scope Status
If the end user swipes "Submit" to "Yes" at a "Project Level Only" a word document will generate and store the document in the document library for the project.
Note: this is only available at a Project level, not program or portfolio.
Benefits
The definition of a benefit within Project Hub P3M, is a measurable or perceived advantage, gain, or positive outcome resulting from the successful completion of a project. Project benefits can take various forms, including financial gains, improved productivity, increased efficiency, enhanced customer satisfaction, and reduced risks, among others.
Project benefits are typically identified and documented during the initiation or business case phase of a project and are used to evaluate the success of the project. They are also used to justify the investment of time, money, and resources in the project.
Project benefits can be tangible or intangible, quantitative or qualitative. Tangible benefits are those that can be measured in terms of money or time, such as cost savings, increased revenue, or reduced cycle time. Intangible benefits, on the other hand, are those that cannot be easily quantified, such as improved customer satisfaction, enhanced brand image, or increased employee morale.
Overall, project benefits represent the value that a project delivers to stakeholders, including the project team, sponsors, customers, and other key stakeholders.
Benefits can only be recorded at a Project level, however they will show up and appear at a program and portfolio level. To create a benefits navigate to the "Benefits" tab of the project:

Benefit Dashboard
This dashboard shows a summary view of project benefits as well as a series of financial and investment values. The below list describes the formulas for the values:
- Project Investment: The total budget of the project
- Target Benefit: The total forecasting financial benefit
- Realised Benefits: The total realised benefits
- Project Duration & Dates: The duration of days (between the project start and finish dates)
- PV- Present Value: This shows the present valued financial amount and what it's worth currently, according to the discount rate. The value is derived from the following formula: PV=FV / (1+i)^n
- FV - Future Value: This shows the future amount value according to the discount rate. The value is derived from the following formula: FV=PV x (1+i)^n
- NPV - Net Present Value: Derived from the formula: NPV = PV - I (Internal Investment)
- IRR - Interest Rate of Return %: Indicates the annualised rate of return for the project (generally the higher the value the better)
- Discount Rate % : Is a rate that's used to discount the future value of cash flows in terms of the present value. Note this is a set rate across all years.
To create a new benefit select + New Benefit. On the summary form:
- The default the Status of the benefit in Draft and just the name is a required field.
- Choosing the benefit type of financial or non financial will derive the form on the right hand side.
Financial Benefits
- Upon selecting a financial benefit, the end user can enter in the summary tab information and then navigate to the "Investment" tab of the project to update the forecast, and if already known enter the actual realised benefits. A user can enter benefit forecast, actuals at a year, quarter or month level.

Non-Financial
- Upon selecting a non financial benefit the end user can choose the appropriate values for:
- Unit (choose percent or number)
- Metric (enter the item name - example "Co2 emissions")
- Operator Value (choose a choice field from drop down list)
- Increase
- Decrease
- Reach
- Stay below
- Stay above

Note: Benefits can currently only be recorded at a project level. It is on the roadmap for future release for a program level.
Investments
Investment definition within Project Hub P3M, refers to the allocation of financial resources, time, and other resources to a project with the expectation of generating a return on that investment. In other words, project investment is the amount of money and resources that are invested in a project with the goal of achieving specific project outcomes or benefits.
The Investment tab represents both financial spend (Budget, Forecast, Actual) as well as Resource Costs, and Benefits. Designed to help the Project, Program and Portfolio Manager gain visibility of the entire spend and benefits at a P3M level.
The Investment grid/tab can be found within a Project, Program, and Portfolio. The dates for the investment grid are related to the project start and finish date on the "summary tab". If the fiscal years have been set by the administrator then you may see a different financial year.Note: The investment grid can only be edited at a Project level.
Update Budget, Forecast and Actuals
The investment grid displays 3 levels. Editing can only be achieved at level 3. The 3 levels include:
- Budget category: these values are set by the administrator
- Cost Category: these values are set by the administrator
- Cost Sub Category: these values are set by the administrator
The end user can edit the financials at the following levels. (note pro rata will occur if editing at a year level)
- Year
- Quarter
- Month

Resource Costs
Resource costs are driven from the resource hourly rate set on the resources rate card, and actual hours completed in either a timesheet or as by entered from the workforce manager.
Benefits
Benefits can be edited by updated the forecast and actuals columns in this grid. Refer to the "benefits" section above for further details.
Documents
Documents within Project Hub are visible on the project record, however your administrator may have set up documents on programs and portfolio's. Project Hub P3M, supports the integration with SharePoint Online, and SharePoint Document Site Libraries, where each time a project is created, a folder is created within the document library. The library location is provided by the organisation.

The Documents tab shows what is known as an “iFrame” within the tab to a SharePoint Document Library URL. This means that you can create and manage documents directly in the SharePoint URL and or the Document tab of the project.
If you choose to use the template document generation feature within the application those documents will be stored within the document library when the user selects the button in the ribbon. Out of the box Project Hub P3M, has the ability to auto-generate:
- Concept Brief document (select "Generate" in the top ribbon)
- Business case document (select "Generate" in the top ribbon)
- Project Management Plan (select "Generate" in the top ribbon)
- Change Management Plan (select "Generate" in the top ribbon)
- Project Status Report (select "Submit" on a status report record for a Project)
Workforce Management
Resources
The definition of a resource within Project Hub P3M, is a user, material or equipment that is necessary to successfully complete a project. Resources are essential components of any project, and their effective management is critical to project success.
The different types of project resources include:
-
Human resources: These are the people who will be working on the project, including project managers, team members, contractors, and vendors.
-
Material resources: These are the physical materials and supplies needed to complete the project, such as tools, equipment, and raw materials.
-
Financial resources: These are the funds required to support the project, including the project budget and funding for any necessary purchases.
-
Informational resources: These are the documents, data, and information required to manage the project, including project plans, reports, and other documentation.
Effective resource management involves identifying the resources needed for the project, acquiring those resources, allocating them appropriately, and monitoring their use throughout the project lifecycle. Good resource management can help ensure that a project is completed on time, within budget, and to the desired quality level.
Resources within Project Hub or Workforce App rely on roles to be set for each resource. All forecasting is completed by role for the following reasons:
- a resource may be working on multiple projects with different rates
- a resource may perform multiple roles on projects
The following definitions apply to resource grids and terminology
- Capacity (how many hrs per day can the resource work based on their calendar
- Planned (how many work hrs are planned for the resource)
- Available (Capacity minus Approved planned work hours)
- Utilisation (approved planned divided by capacity)
Creating resources can be achieved by selecting "Resources" on the left navigation under workforce. Create new resource, by entering in the user details by clicking on the search icon. (if the user you need to create does not exist then request for your administrator to add additional users to the app). Once the user is selected, other fields will populate on the form.

To associate a role to a resource click the three dots in the section Resource Role to associate a role. (If the role does not exist create a new role and or request your administrator to create a role). Associate skills to the resource by selecting the three dots again (add multiple skills or roles for each resource).
The Work Hours tab allows you to set the work calendar for each resource. Editing the calendar sets the resource capacity (how many hours a day they can work). To edit the calendar select the default blue row and edit the days, capacity in the right hand quick menu pane.

Resource Requests and Approvals.
The workforce feature allows requests to be created at either a project manager level or a workforce manager level. Both options however can also work at the same time.
Project Resource Requests
Resources can be requested by Project Managers, by clicking on the resource tab then choosing "Add" to add a new resource, once highlighted and submitted the approval for the resource is navigated to the resources owner/manager. If the workforce manager, approver decides to change dates and swap resources, they can and then approve. The resource tab is designed to share with the PM who is assigned to their project.

Remember, if the tab is not showing for you on a new Project, make sure it's selected on the Tab Selector. Once on a new project the Resources grid will be empty.
Note: Always make sure that the bookable resource has a Role assigned to the record, else the resource preferred name will not appear.
Resource Bookings
The resource bookings grid provides a single view of all resource requests, enabling workforce managers to easily manage and track resource availability, and to efficiently handle all booking requests from a centralised location. This means that workforce managers can also submit and approve requests within the P3M Resourcing screen.

By using filters, managers can easily sort and analyse data in resource bookings, including
- By resource, by role or by project
- Hours/Days view
- Role Filters
- Locations
- Year
The resource booking grid provides workforce managers with a range of operations that can be performed, including:
- Add new booking requests
- Delete existing booking requests
- Approve or Reject booking requests
- Mark requests as Need to Review
- Refresh the record immediately
Indicators are used to show the approval status and resource availability
- Green - the request has been approved
- Red - the request has been rejected, or the availability of resources has been exceeded
- Grey - the request is In Progress
Resource Approvals

To approve or reject the request, workforce managers need to:
- Select the request that is In Progress
- Click "Approve" or "Reject" or "Review" button on the top command bar to process approval
- Click "Save" to save the approval result
- After that, the Status will reflect the decision made by workforce managers
Managers must refer to the planned and available hours/days in the time sheet in order to accurately assess the capacity and availability of resources, and make informed decisions
If the resource request has been rejected, project manager will be informed and can go back to the Resource Grid on project form to submit a new request
Resource Overview
Once a resource has been assigned to the project it needs to get approved for the total amount of hours or days, depending on the filter selected. The first row can be seen as a bookable resource still awaiting approval, whereas all the other resources have been approved for those amount of days.

- Capacity - Shows the amount of days or hours the resource available for.
- Planned - Shows the planned amount of days the recourse is likely to be used for the Project.
- Actual - Shows the actual amount of days the resource has been on the Project for on the month.
- Available - Shows how many days or hours the resource has available for the month to be used.
- % Utilised - Shows the percentage on how much the resource is being utilised for the month.
- Day Rate - Shows the daily rate of the resource which is also automatically added to the investment grid.
Note: Depending on the resources calendar - The number of capacity will be influenced. To view the resources calendar simply go to the resource under the Workforce area and select the resource. Once in the resource head to work hours, once on the tab the calendar will appear.
Calendar
The calendar section of Project Hub can be seen as an Event tracker for the company. The Calendar can be found under the Governance section on the left navigation.
To create a new event simply click on the "+ New". This will open a new window with similar fields as booking an Outlook meeting. End users can then use the default views to track by day or month meetings, events, due dates for steerco's etc.
Once the event has been filled out completely and saved, this will appear in the calendar of Project Hub, as shown below:

Feedback
The feedback form in Project Hub P3M is designed to allow project team members to provide feedback on various aspects of the project, such as the project management process, the performance of team members, the quality of deliverables, and the effectiveness of project management tools and features. The feedback form can help project managers to identify issues and areas for improvement, and to make informed decisions about project strategy and resource allocation. By encouraging open and honest feedback from all project team members, the feedback form can also help to foster a culture of transparency, collaboration, and continuous improvement within the project team.
Feedback can be created as records in the system, reflecting users’ suggestions and experience when working with the system. Feedback can be used to suggest any negative of positive experiences.
There are multiple types of feedback to select from namely:
- Bug
- Idea
- Enhancement
- Lesson Learned
- Training Request
- User Request

- Title: enter the title of feedback
- Description: the details about the feedback
- Proposed Resolution: enter the proposed resolution to address the issue raised in feedback
- Type: select feedback type
- Category: select feedback category
- Experience: select the experience related to the feedback from Positive, Neutral or Negative
- Feedback Status: Select the status of the feedback
- Effort Estimated: enter the estimated efforts in hours
- Effort Approved: enter the approved efforts in hours
- Priority: rate the priority of the feedback on a scale of low, moderate, high, very high or extreme
Approvals
The approvals section of the Project Hub P3M app, is a location where all approvals appear within a single view. Approvals include "acceptance approvals" on risk, issue, benefits , dependencies, actions, stage gates, business cases. The approval centre is designed for end users to see all outstanding "awaiting approval" as well as "approved" and or "in review" "rejected" records. Administrators can see all approvals.
Audit Logs
Audit logs can only be found on each Project, Program and Portfolio records. The use of the Audit tab feature is to capture all the changes made in the current record. It will capture most entity changes even the Investment grid changes. The audit log can use filters to search for specific changes on the record. An example of this can be seen below with the filter set to the Investment grid's updated budget:

Workstreams
As mentioned under the Project section, a workstream can be seen as a project within a project, almost as a smaller project. To see all active workstreams go to the Workstream section of the left navigation under Business Units. An example of a workstream can be seen below called "Traffic Signal Upgrade":
Note: If your workstream is not showing in the list, remember to set the Project record type to Workstream and click save & close. Your Workstream will then appear in the list.

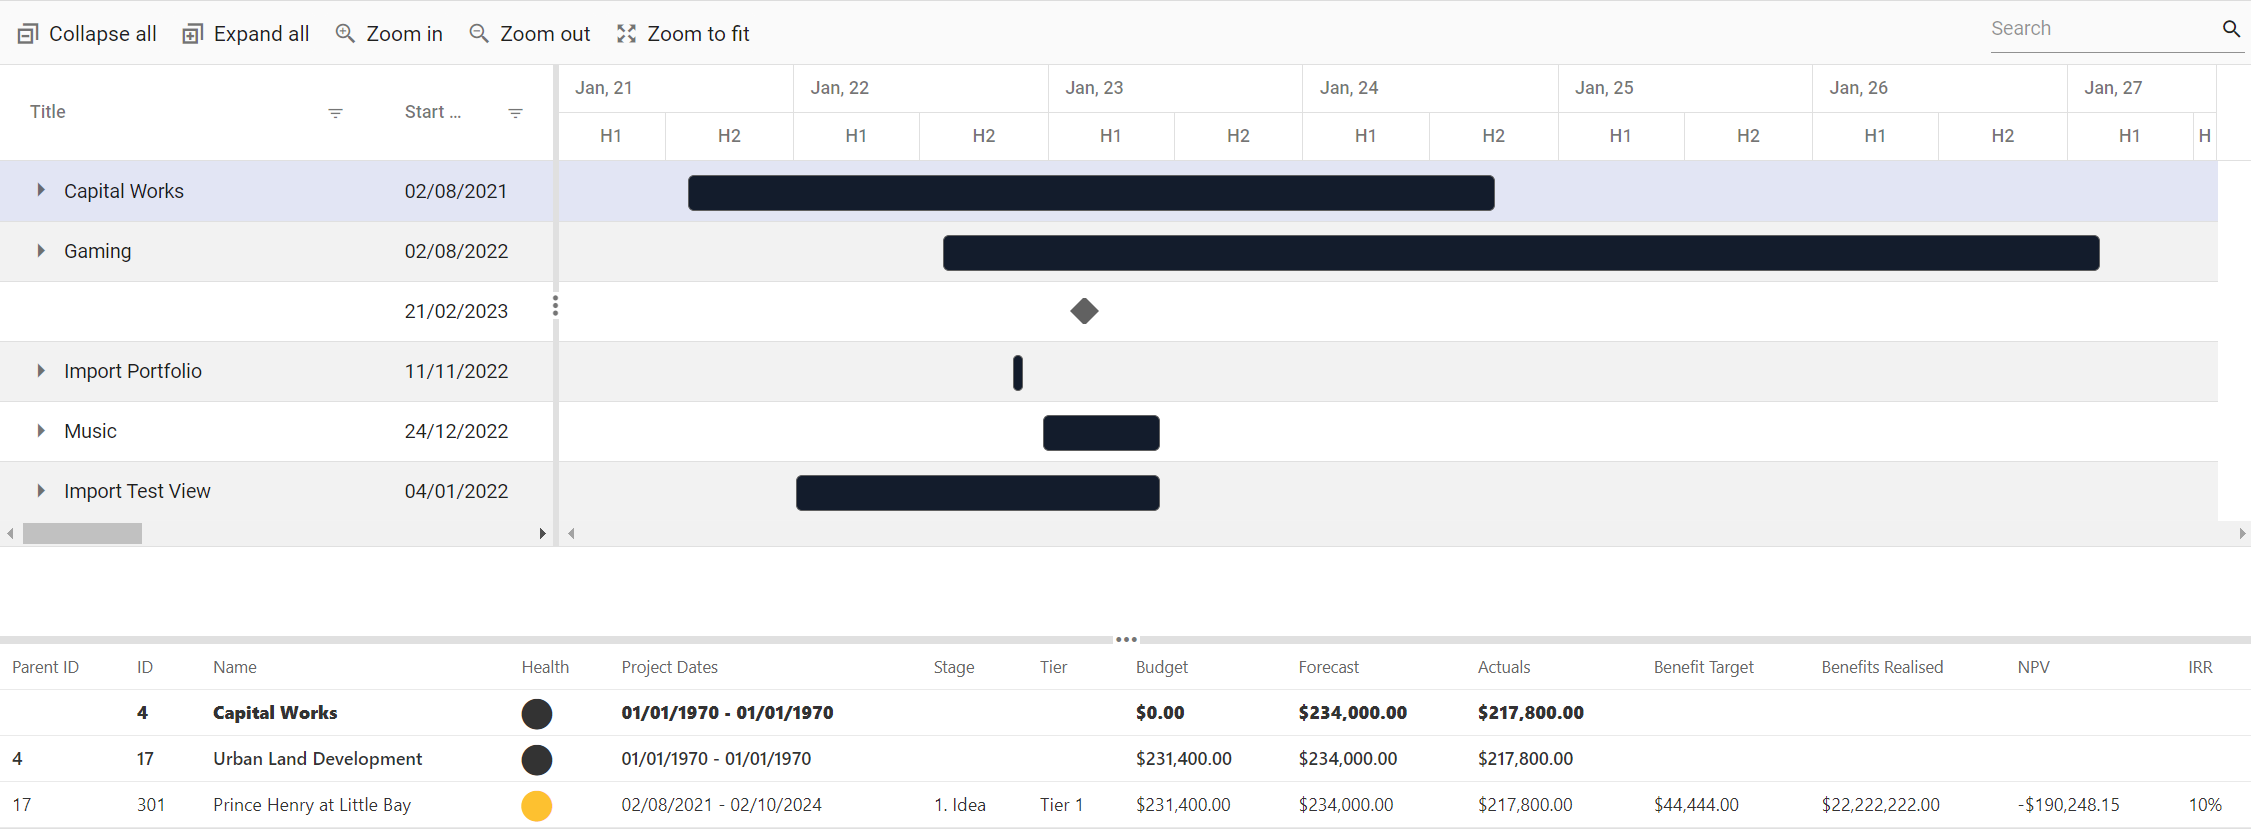
Roadmap
The Roadmap feature can be seen as an interactive record tracker similar to a Gantt chart to show/track all the records starting from the Portfolio record. The Roadmap feature will show the following details of the records:
- Project ID, Parent ID
- Project Name
- Health Status
- Project Dates
- Stage
- Tier
- Budget
- Forecast
- Actuals
- Benefit Target
- Benefit Realised
- NPV
- IRR
Strategic Themes
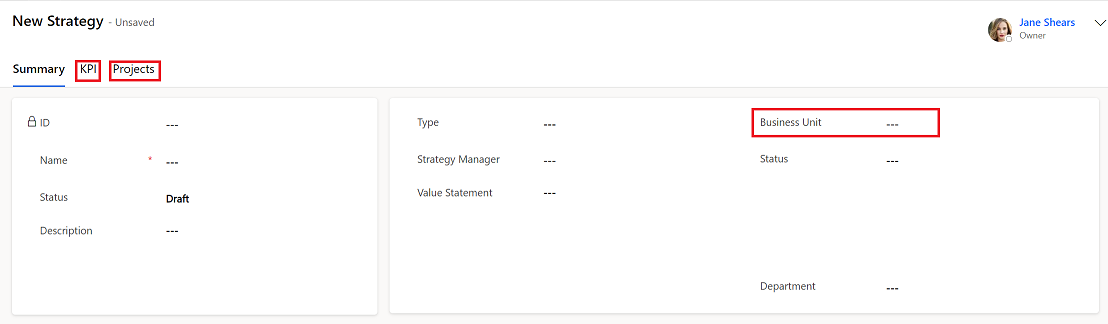
Strategic Themes Form
Project Strategy is an overarching set of guidelines to be used by the project in making decisions and taking action throughout the course of the project. After a user has created and saved a new strategy the user is also able to add any KPI by select the "KPI" tab on the form. A strategy can be linked to any Project by selecting the "Projects" Tab and adding an existing Project to the table as well as adding a Business Unit as illustrated with red boxes below:
KPI
As mentioned above, KPI's can be added once a strategic theme has been saved. Once saved, simple go the "KPI" tab and select "+ Add new KPI". Fill in all relevant fields such as the KPI type may it be:
- Financial
- Customer
- Process
- Delivery
- Wellbeing
After filling in most fields and adding KPI Scores, a graph of the KPI can be seen indicating an increase or decrease of the KPI. Below is an example of a KPI called "Accessible fleet":

Strategic Themes can be found under the Strategy section of the left navigation. As highlighted below:

Changes
Changes Form
Changes can be found under each Project, Program, Portfolio or Business Unit. The Changes form can be used to track any changes on each level and what the impact of the change will be. The Changes form is demonstrated below from a Project called "Prince Henry At Little Bay":
Note: If unable to locate the Changes Tab, remember to select it through the Tab Selector function.

Note: Once saved, the changes can be submitted by toggling the Submit for Approval field on the form.
Actions
Actions Form
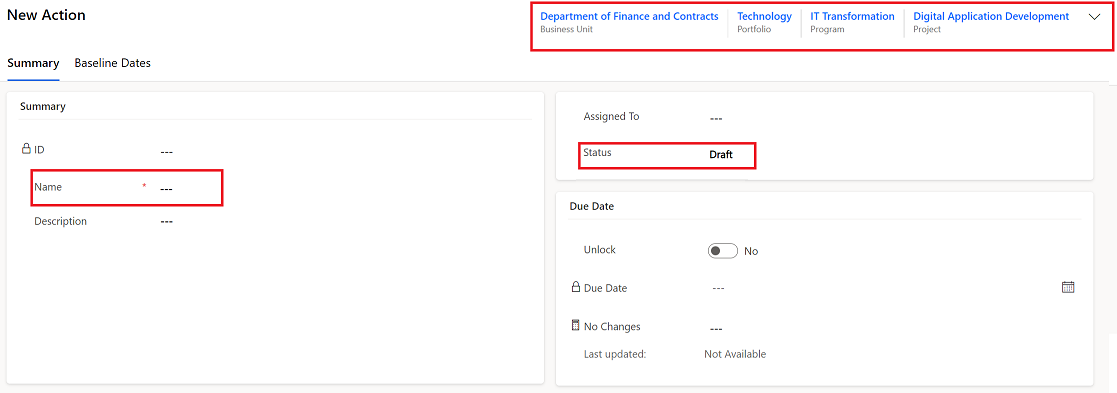
Actions can be found under each Project, Program and Portfolio level however not at a Business Unit level. The Action record can however be linked to a Business Unit. To add an Action record simply go to any Project, Program or Portfolio record and look for the Actions Tab. From there click on "+ New" to create a new Actions record. Once on the record form, as a mandatory field, give the Action a Name and set the status to either Draft, Open or Closed. The Action record can also track any changes by toggling the Unlock field to change the Due date and saving. Thus the Action record can keep a track of all the Baseline dates. A new Action form is demonstrated below from a Project record called, "Digital Application Development":
Reports
On the Project Hub application there are 33 PowerBi Report available to use and track any record on the application. The reports can be accessed via the side navigation and selecting Reports, as shown:

Note: If unable to view the reports, please make sure that the correct PowerBi License has been assigned to you.
The reports are broken up into 6 Categories:
- Status Reports
- Delivery
- Workforce
- Investment Reports
- Scheduling
- Strategy
Resource Overview
The Resource Overview gives an overview of all resource that are listed in Project Hub. From this tab an end user is able to track it's workforce to all Projects:
- Plan & manage resources
- Track actual effort against projects
- Manage utilization
- Capacity thresholds
Below shows how the Resource Overview is being illustrated, which is being filtered by Resource and Resource Role:
Dashboards
All Dashboards that are being demonstrated below have been edited using HTML and JavaScrip. They are not PowerBi reports, however they are all interactive.
Home Dashboard
The following section highlights the Home Dashboard of Project Hub showcasing all Project:

Top Section:
Total Budget: Money that allocated to all projects/programs/portfolios.
Realized Benefits: Summed up total values of realized benefits from child records.
ROI: Rate of Interest, value calculated from (Realized Benefits - Budget) / Budget, showing if the whole enterprise is making profit.
Total Projects: Count the number of Active Projects where ‘Record Status?’ equal to "Active".
Note: 'Field Name' on Change Form.
Middle Section:
Project Cost Performance: Evaluate how much is being allocated as budget and how much has already been cost, showing percentage of used budget.
Projects By Overall Health: Count the number of projects that are tagged with different overall status: "Green", "Amber" or "Red" based on ‘Overall Status?’ .
Projects By Tier: Count the number of projects are tagged with different tier values: "Tier 1", "Tier 2", "Tier 3" or "Tier 4" based on ‘Project Tier’ .
Bottom Section:
Active Risks: Shows the active risks with different ratings: "Low", "Moderate", "High", "Very High" or "Extreme" based on ‘Risk Rating’. Unassigned records will be calculated as "Not Assigned".
Active Issues: Shows the active issues with different ratings: "Low", "Moderate", "High", "Very High" or "Extreme" based on ‘Issue Rating’. Unassigned records will be calculated as "Not Assigned".
Project Status Reports by Month: Shows the number of status report created in the passed 6 months, columns showing overall status "Green", "Amber" or "Red" for each month.
Project Dashboard
The following section highlights the Project Dashboard of Project Hub for a Project Called "Prince Henry at Little Bay" :
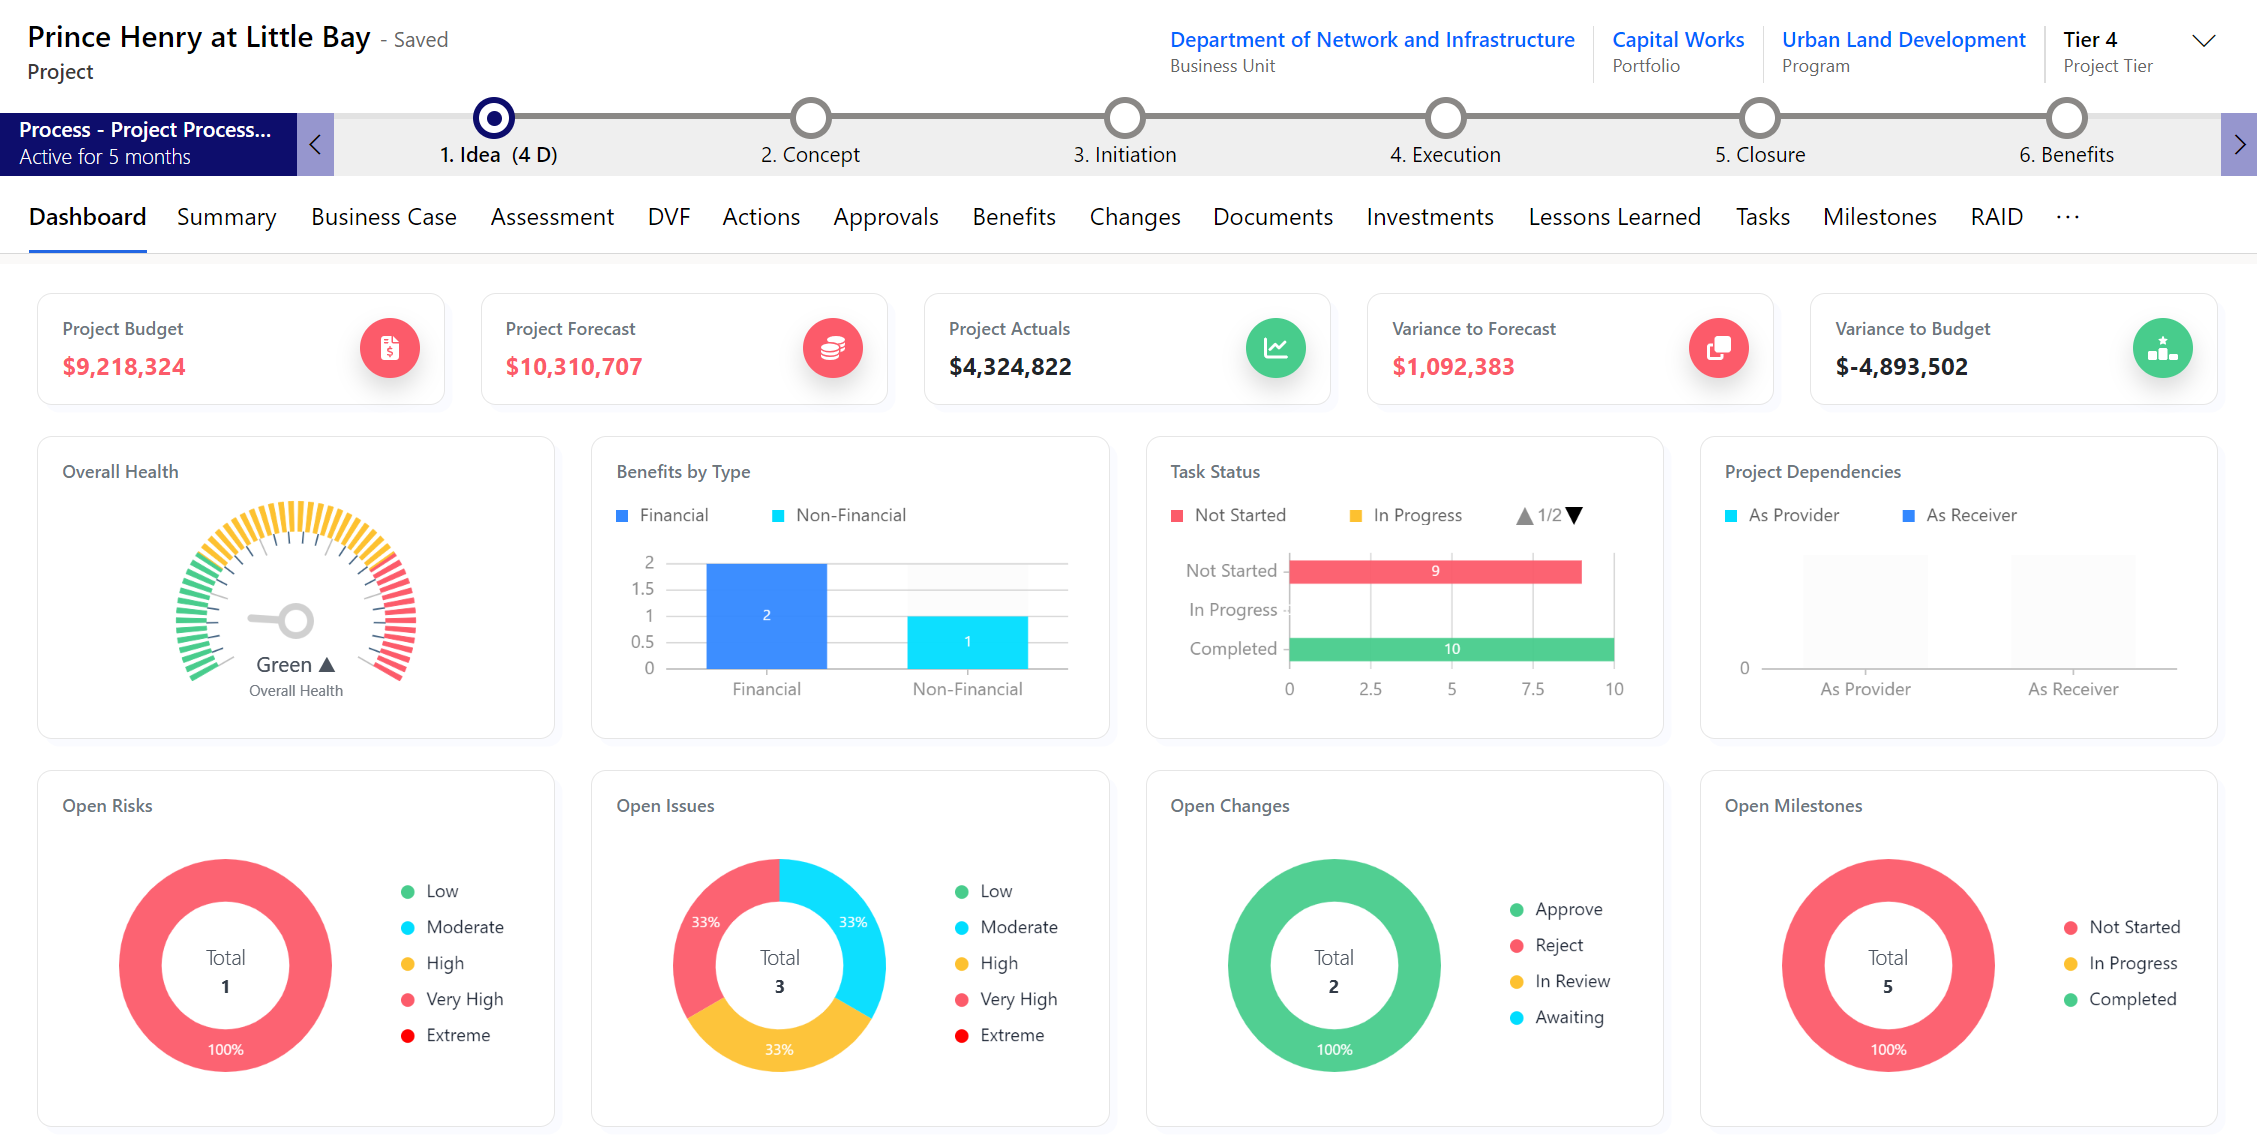
Top Section:
Project Budget: Money that allocated to the Project
Project Forecast: Money that is forecasted to the Project
Project Actuals: Money that are the actual cost of the Project
Variance to Forecast: The variance formula is used to calculate the difference between the forecast and the actual result
Variance to Budget: The difference between the budgeted or baseline amount of expense or revenue and the actual amount.
Middle Section:
Overall Health: Showing the latest status of this project from the most recent created record of Status Report.
Benefit by Type: Showing the current benefits by Financial or Non-Financial Type.
Task Status: Showing a project's Tasks status being Not Started, In progress and Completed. This can be filtered by clicking the arrows.
Bottom Section:
Project Dependencies: Shows the project's dependency status.
Open Risks: Showing the active risks of a project categorized by rating: "Low", "Moderate", "High", "Very High" or "Extreme".
Open Issues: Showing the active issues of a project categorized by rating: "Low", "Moderate", "High", "Very High" or "Extreme".
Open Changes: Showing the active Changes of a project categorised as: Approved, rejected, In Review and Awaiting.
Open Milestones: Showing the active Milestones of a project categorised as: Not Started, In Progress or Completed.
Program Dashboard
The following section highlights the Program Dashboard of Project Hub for a Program Called," Urban Land Development" which was linked to the Project above:
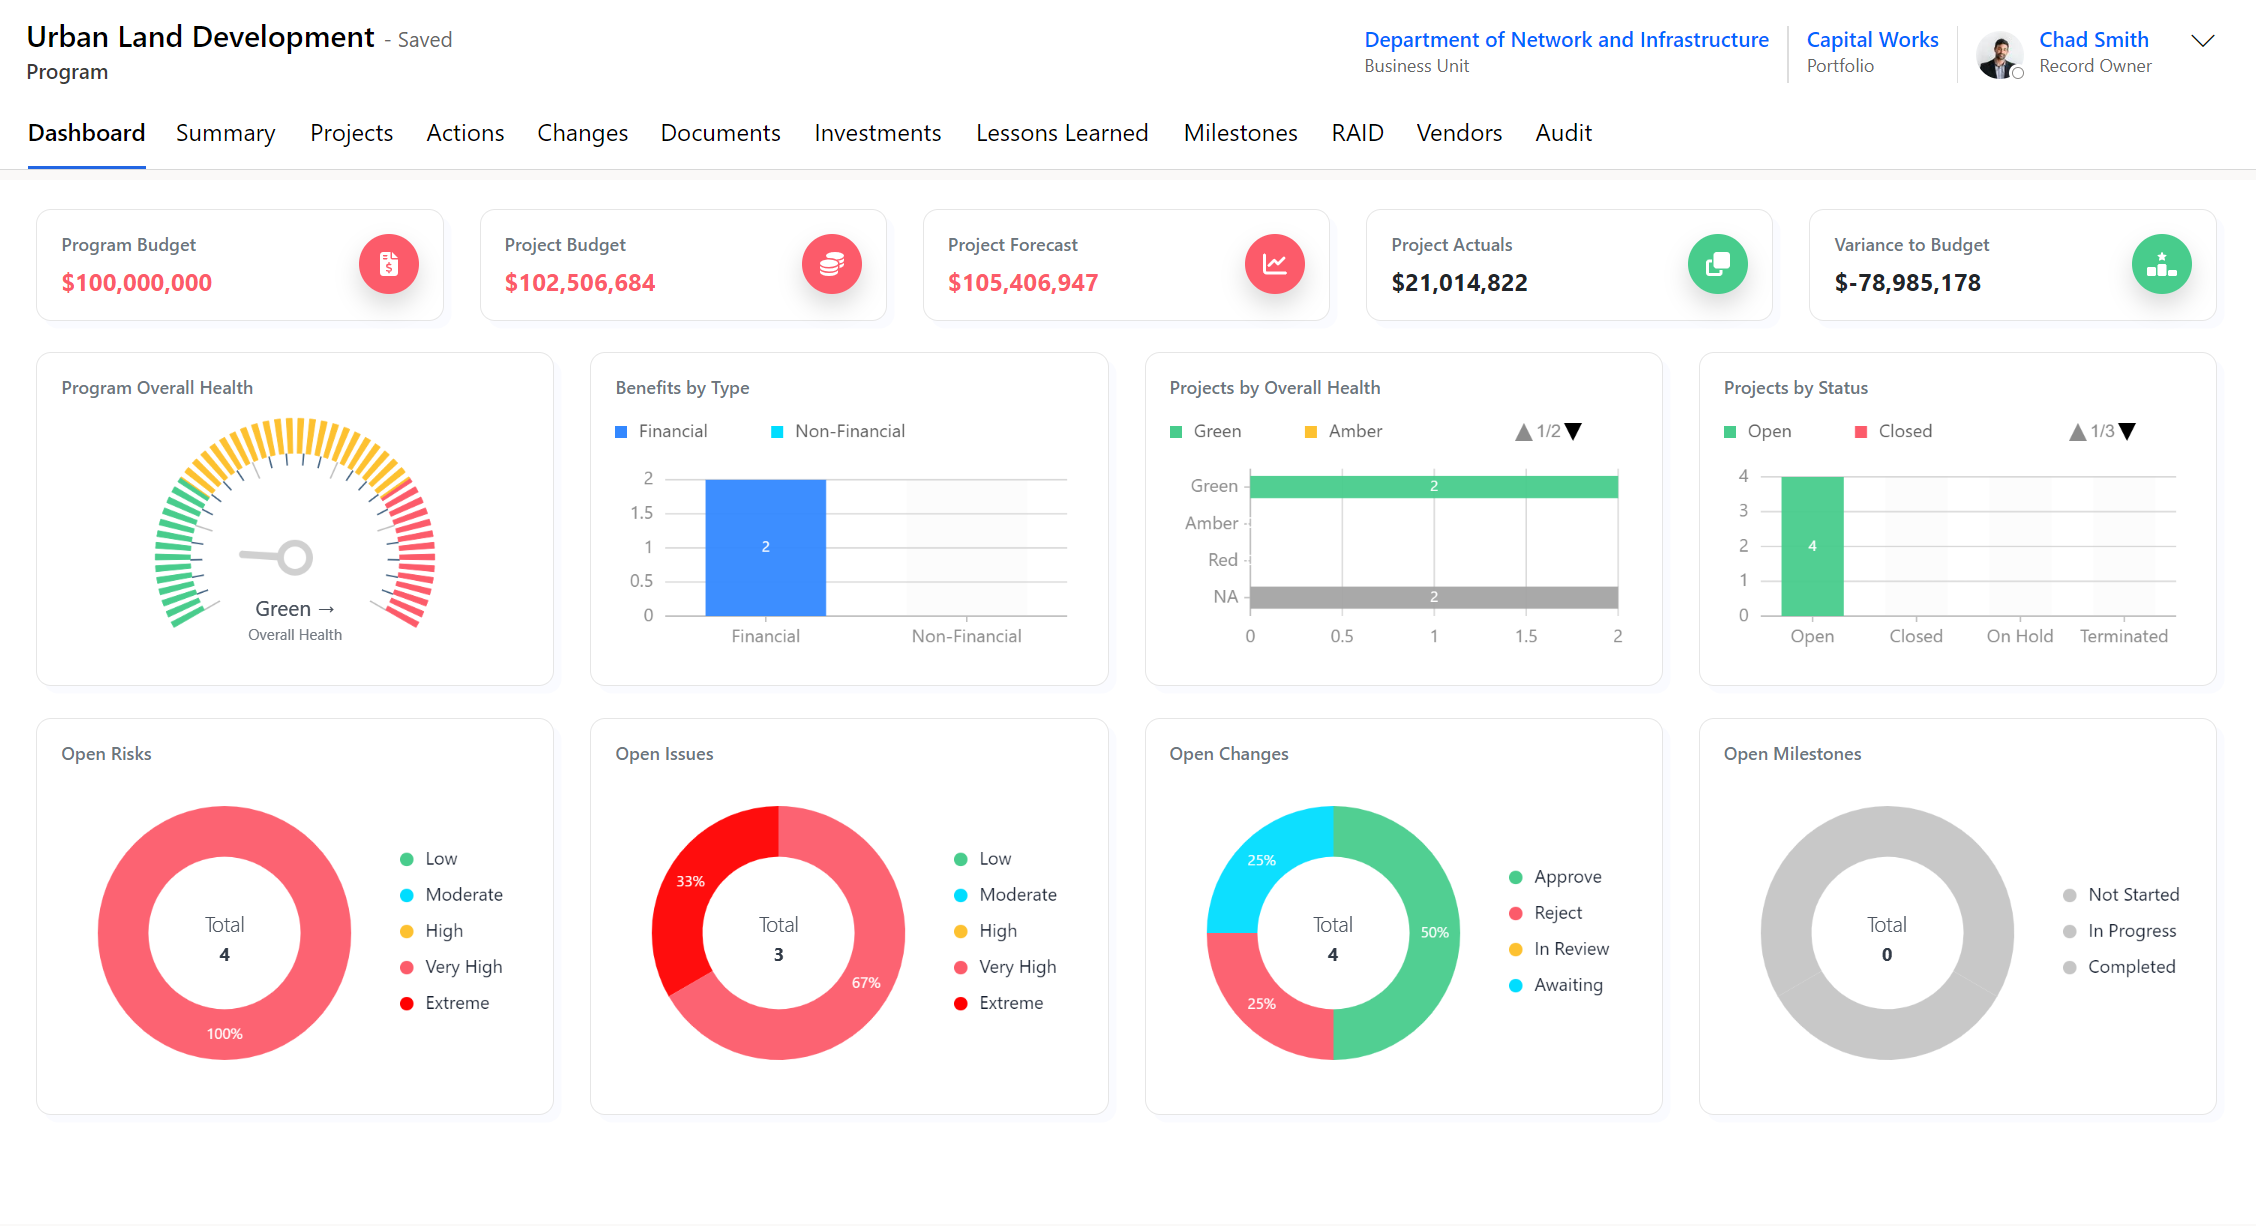
Top Section
Budgets: Showing the amount of money that is allocated to this program as budget. Calculated from the projects belonging to a program.
Actuals: Showing the amount of money that is spent so far. Calculated from the projects belonging to a program.
Middle section
Overall Health and Statuses: Showing the latest statuses of this program from the most recent created record of Status Report.
Benefit by Type: Showing the current benefits by Financial or Non-Financial Type
Task Status: Showing a program Tasks status being Not Started, In progress and Completed. This can be filtered by clicking the arrows.
Bottom Section
Active Risks: Showing the active risks of this program categorized by rating: "Low", "Moderate", "High", "Very High" or "Extreme".
Active Issues: Showing the active issues of this program categorized by rating: "Low", "Moderate", "High", "Very High" or "Extreme".
Open Changes: Showing the active Changes of a program categorised as: Approved, rejected, In Review and Awaiting.
Open Milestones: Showing the active Milestones of a program categorised as: Not Started, In Progress or Completed.
Portfolio Dashboard
The following section highlights the Portfolio Dashboard of Project Hub for a Portfolio Called," Capital Works" which was linked to the Project and Program above:
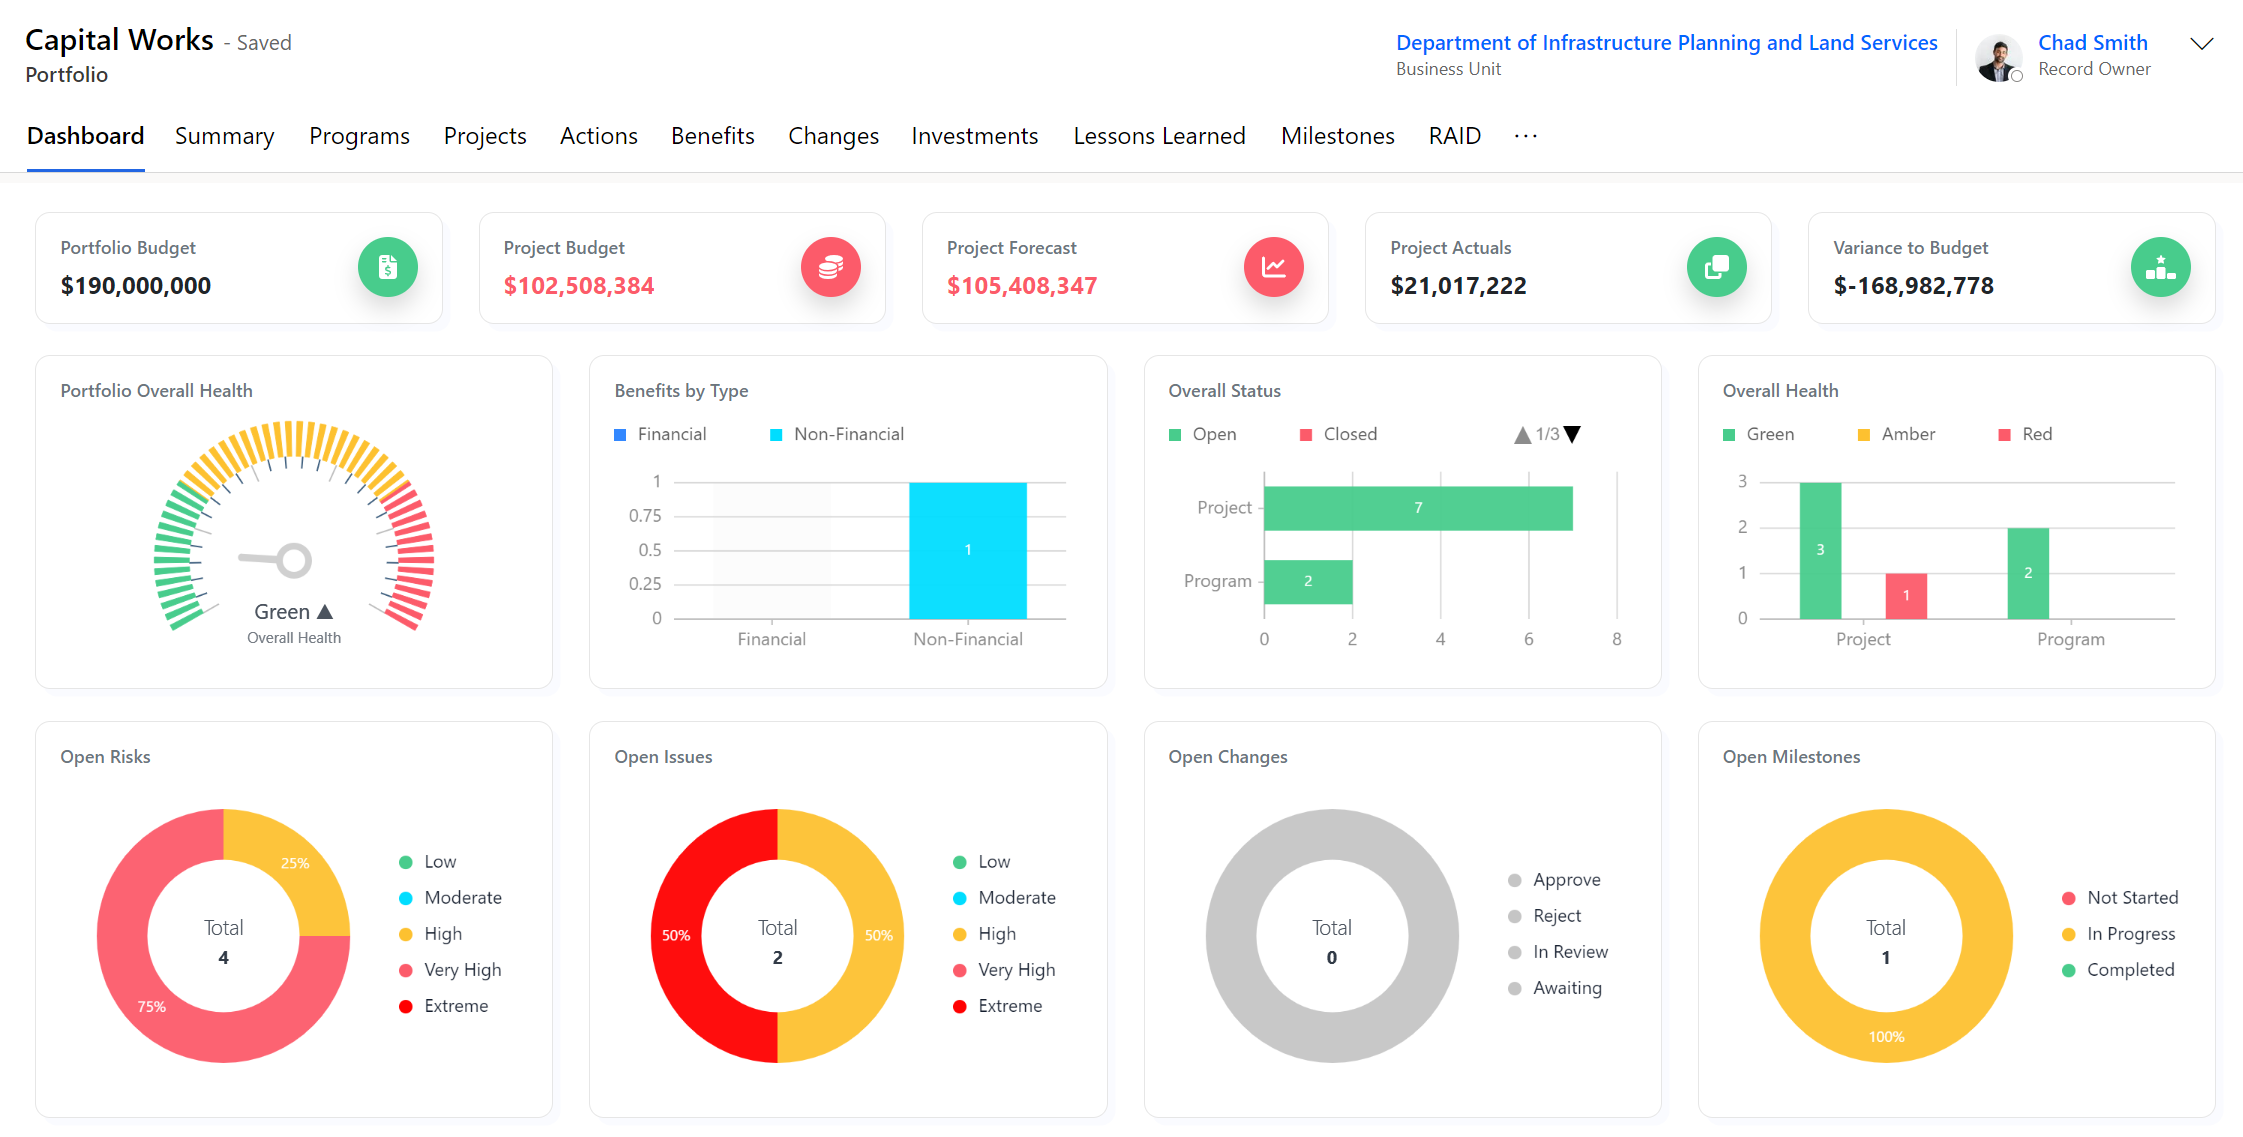
Top Section:
Portfolio Budget: Showing the amount of money that is allocated to this portfolio as budget. Calculated from the projects(programs) belonging to a portfolio.
Portfolio Forecast: Showing the amount of money that is forecasted to this portfolio. Calculated from the projects(programs) belonging to a portfolio.
Portfolio Actuals: Showing the amount of money that spent so far for this portfolio. Calculated from the projects(programs) belonging to a portfolio.
Variance to Forecast: The variance formula is used to calculate the difference between the forecast and the actual result.
Variance to Budget: The difference between the budgeted or baseline amount of expense or revenue and the actual amount.
Mid Section:
Overall Health: Showing the latest status of a portfolio from the most recent created record of a Status Report.
Benefit by Type: Showing the benefits by Financial or Non-Financial Type.
Task Status: Showing the a Portfolio 's Task status being Not Started, In progress and completed. This can be filtered by clicking the arrows.
Project Dependencies: Shows the a Portfolio's dependency status.
Bottom Section:
Open Risks: Showing the count of open and active risks of a Portfolio categorized by rating: "Low", "Moderate", "High", "Very High" or "Extreme".
Open Issues: Showing the count of open and active issues of a Portfolio categorized by rating: "Low", "Moderate", "High", "Very High" or "Extreme".
Open Changes: Showing the count of open and active Changes of a Portfolio categorised as: Approved, rejected, In Review and Awaiting.
Open Milestones: Showing the count of open and active Milestones of a Portfolio categorised as: Not Started, In Progress or Completed.